Better!
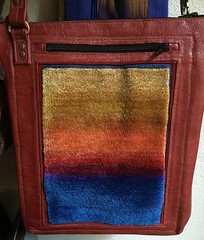
New Bag! Hand spun silk pile, a piece I really like for its colors. This is a do-over, it used to be this:

When I first started combining leather and textiles in bags, I began where I was: a machine sewer, using clothing weight leather. This first iteration leather is thin, certainly won't wear well, and does not have the body I would like for a bag. I lined and interlined this, but it was still floppy, a pouch, not a bag. So, I took this apart, and in it's new life, the pocket gets a heavier gauge leather.
There are lots of tiny cramped spots to sew on a bag: little places a standard sewing machine cannot reach. I tried a commercial sewing machine for a while, but ...same problem. And...even the commercial machine slipped stitches, every now and then. Leather is a tough customer. I was not (still am not) interested investing in a real leather sewing machine: this is, after all, an exploration, not a business. I solved this dilemma with hand sewing. I am so enamored of hand sewing that I only sew leather by hand now.
This bag has lots of upgrades that I have learned over the (now) years! I have been learning this craft. Most are probably common sense, but some are experiential: how I use the bags, and how they hold up in use. Such as the bag from the last post.
This pocket has leather backing, like the previous one, but! it is a stiffer leather, and...there is a larger hem at the base of the textile to stay sewn in, and! the pile patch is not sewn flat to the leather: there is a bit of a bubble, so it has room, should the pocket stretch out in use. The back of the pocket is more supple leather, so the stretch should go that way, into the body of the bag, rather than out, toward the pocket.
Of course, I could be aware of not overloading the pocket! But that would not be a real life test. There will always be times when I stuff stuff in. And the perfect bag, mythical beast that it is, will not be something that you have to think about when loading or carrying. It will just perform.
In comments on the last post, Marlene asked if the pockets have a lining, and yes, they do: each textile is sewn to a fabric, which is then backed with leather, and stitched to the bag. Then, the pocket back is sewn to the bag (that's the outline you see around the pocket). I think the construction method is acceptable; we shall see. But thanks for the suggestion, and I am open to ideas if anyone thinks I need a nudge :).
Some of the many things I have learned:
zippers needs stops:

I assemble the zippers, so they are custom lengths. They have metal stops at the bottom and top (side/side, whatever), but if they butt up to the edge of the space, they can be ornery and difficult to work. So they now have leather stops at each end.
I made a small bag to test out inserting tabs, for easier zipper pulling:
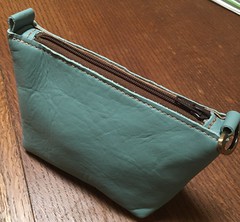
This small bag, by the way, was so much fun and so gratifying to make, in a short span of time, that I fear it will be the first in a series of small bags. This one holds cords for charging phone and iPad, and iPod and some folding headphones. It goes inside the other bags. Matryoshka Bags! How much fun could I have????!
This last little bag counts as #25 in the quest for 100, so I am 1/4 to my goal! Little bags should help reach it faster. and believe me, I am getting so much better with each one. My stitching is more fluid, my stitches are more uniform, I know which tight spots I need to solve first, before the bags go together, and for all intents and purposes,what I need more is repetition, repetition and more repetition.
Things are looking up. I am getting better, not great yet, but I persevere. I was a good Girl Scout: Good, Better, Best, Never let it rest, 'til my good is better and my better best!
posted by Sara at 10:47 AM
![]()
![]()

1 Comments:
This comment has been removed by a blog administrator.
Post a Comment
<< Home