Inkle Weaving 101
As promised, an inkle loom tutorial.
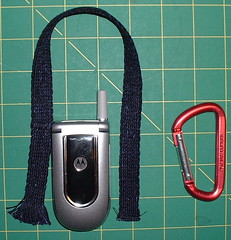
First: what to make? I decided to make a bag for my cell phone, killing two birds, etc., by also giving Naomi an example of *what one could do with inkle bands*.
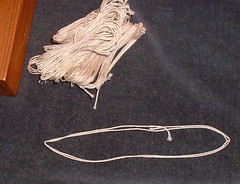
So here are the specs, the cell phone needs a bag about 3" by 5". I want it to hang outside my tote bag, so it needs a clip, and a small handle. This leftover silk cardweaving might do for a handle (said handle needs to be short, so the bag won't fly around and bang itself at every turn):
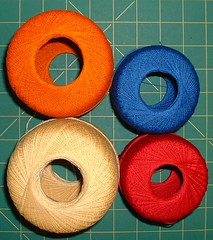
I'm using crochet cotton for this band, just to make sure the materials are generally accessible to anyone. Here are the colors I will use:
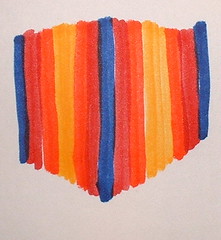
So I make a quick sketch to see if the colors, and color order are OK for the bag I have planned:
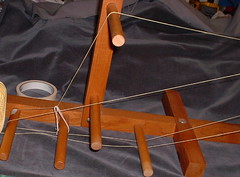
Now, we need a loom:
My old, handmade one. The Schacht is currently tied up, so I'll use this one, which my Dad made for me. It is not as sturdy or as accommodating for pickup patterning, but I will be making a plain band. (I also have a sentimental attachment to the loom: my Dad died 15 years ago. He was very supportive and made lots of equipment for me, so even if it is not the *most used* loom, it is the *most loved*).
The loom needs heddles, usually string, made according to the instructions that come with your loom. On the Schacht, the heddles are made using three of the pegs on the loom, handy, and the right size. However, I made these:
years ago, and they are the wrong size, oops! so I double them over, and then they are the right size. You will do better, and make yours correctly to begin with. These are made from crochet cotton too.
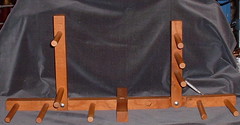
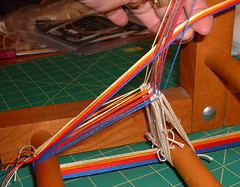
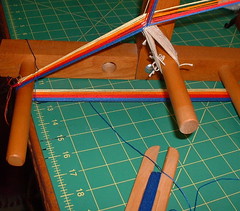
Then we begin warping:
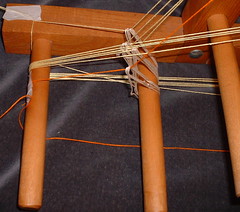
The first thread (yellow) is taped (with masking tape) to the front of the loom. This thread goes over the top peg, and gets a heddle to bring into alignment, then it is carried along the path chosen (short or long band?), and comes back to the start. The second thread by-passes the top peg, and goes to the back peg and around:
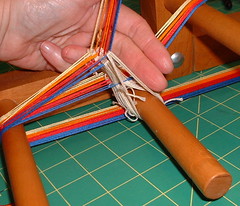
Only the threads that go over the top peg get heddles, the remainder are simply wound around and left un-heddled, free, so to speak. Once the number of yellow threads is done, the end is cut and taped. Then the second color is added, and the whole process repeats:
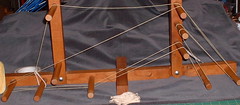
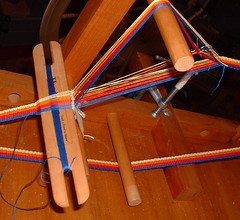
Until all the colors are done. The taped ends are all pulled together and tied into one knot:
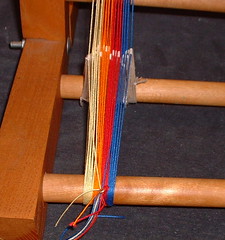
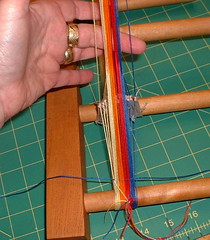
You can tell the design and the width of the finished band by the threads that go over the back peg (the front peg, you remember, has only half of them, the back peg has the full number of threads):
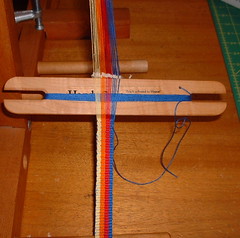
The loom is clamped to the table to make it more stable:
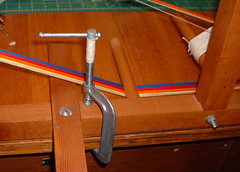
I use an old drafting table as a work space: it is counter height, so I stand to weave, or sit on a high stool. One of my band weaving teachers, Jaquetta Nisbet, was able to sit on the floor and stabilize her loom with her feet: I am not so agile! The clamp-to-the table works fine for me.
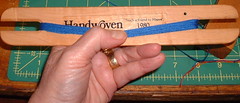
Now we need a weft, I'm using the blue crochet cotton:
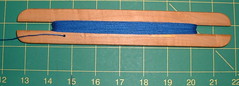
The shuttle is from Interweave's Teach a Friend to Weave Contest (1980), which I entered with a friend, and oh the irony: now we are using the internet to teach several (?) imaginary internet friends to weave:
Jargon Alert: weaving involves passing the weft yarn between layers of warp. The heddles assist in creating the space for the weft to pass through. The space created between the layers of warp is called a shed. The heddles on this loom create two sheds, for plain weave , the classic over-and-under fabric.
The first shed is created by lifting the warps that are not held by heddles:
The second shed is created by pushing down those same warps:
The other warps remain stationary during the weaving process.
The first weft is passed through the shed created by lifting the warps:
The second weft is passed, and on and on:
The end of the weft is tucked into the first few sheds, so that it is captured, and the whole thing doesn't fall apart when I take it off the loom. [Sorry, bad photo, hope you get the concept. By the time I got this out of the camera, and realized its *not usefulness*, it was too late: the weaving had moved on. But(!) what this photo does show, to those who are carefully following along, is that I moved the peg with the heddles. Oops! #2. I forgot which peg they went on. If this were a Real Tutorial (tm), the author would have gone back and started over, with new pictures, to show you the right way to set this up. But this is a Reality Tutorial (tm), wherein the weaver needs to fix a few things as she works. Thank you, now back to your regularly scheduled tutorial].
Weaving continues, advancing the warp as needed. When the weaving gets too close to the heddles, it is hard to open the shed. Periodically, the warps are pulled around to create a more space for the shed. To advance the warp, tension is released, and the threads are pulled around. Eventually, all the warp is woven:
This took about an hour for me, on a Sunday morning, listening to Bhagavan Das chanting. Meditative music and activity combined: my version of devotion, so to speak.
The last few shots were tight:
but I like to get all the warp woven off.
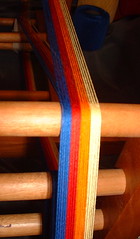
Here is the band just off the loom: about 72" long, with about 10" of loom waste:
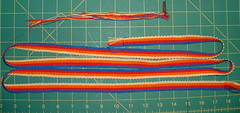
The last step is to wash the band, and press it, sort of like blocking in the knitting world:
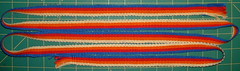
68" of length in the finished band.
Next post: Making the Bag. I can't promise it will be tomorrow, but soon!
First: what to make? I decided to make a bag for my cell phone, killing two birds, etc., by also giving Naomi an example of *what one could do with inkle bands*.
So here are the specs, the cell phone needs a bag about 3" by 5". I want it to hang outside my tote bag, so it needs a clip, and a small handle. This leftover silk cardweaving might do for a handle (said handle needs to be short, so the bag won't fly around and bang itself at every turn):
I'm using crochet cotton for this band, just to make sure the materials are generally accessible to anyone. Here are the colors I will use:
So I make a quick sketch to see if the colors, and color order are OK for the bag I have planned:
Now, we need a loom:
My old, handmade one. The Schacht is currently tied up, so I'll use this one, which my Dad made for me. It is not as sturdy or as accommodating for pickup patterning, but I will be making a plain band. (I also have a sentimental attachment to the loom: my Dad died 15 years ago. He was very supportive and made lots of equipment for me, so even if it is not the *most used* loom, it is the *most loved*).
The loom needs heddles, usually string, made according to the instructions that come with your loom. On the Schacht, the heddles are made using three of the pegs on the loom, handy, and the right size. However, I made these:
years ago, and they are the wrong size, oops! so I double them over, and then they are the right size. You will do better, and make yours correctly to begin with. These are made from crochet cotton too.
Then we begin warping:
The first thread (yellow) is taped (with masking tape) to the front of the loom. This thread goes over the top peg, and gets a heddle to bring into alignment, then it is carried along the path chosen (short or long band?), and comes back to the start. The second thread by-passes the top peg, and goes to the back peg and around:
Only the threads that go over the top peg get heddles, the remainder are simply wound around and left un-heddled, free, so to speak. Once the number of yellow threads is done, the end is cut and taped. Then the second color is added, and the whole process repeats:
Until all the colors are done. The taped ends are all pulled together and tied into one knot:
You can tell the design and the width of the finished band by the threads that go over the back peg (the front peg, you remember, has only half of them, the back peg has the full number of threads):
The loom is clamped to the table to make it more stable:
I use an old drafting table as a work space: it is counter height, so I stand to weave, or sit on a high stool. One of my band weaving teachers, Jaquetta Nisbet, was able to sit on the floor and stabilize her loom with her feet: I am not so agile! The clamp-to-the table works fine for me.
Now we need a weft, I'm using the blue crochet cotton:
The shuttle is from Interweave's Teach a Friend to Weave Contest (1980), which I entered with a friend, and oh the irony: now we are using the internet to teach several (?) imaginary internet friends to weave:
Jargon Alert: weaving involves passing the weft yarn between layers of warp. The heddles assist in creating the space for the weft to pass through. The space created between the layers of warp is called a shed. The heddles on this loom create two sheds, for plain weave , the classic over-and-under fabric.
The first shed is created by lifting the warps that are not held by heddles:
The second shed is created by pushing down those same warps:
The other warps remain stationary during the weaving process.
The first weft is passed through the shed created by lifting the warps:
The second weft is passed, and on and on:
The end of the weft is tucked into the first few sheds, so that it is captured, and the whole thing doesn't fall apart when I take it off the loom. [Sorry, bad photo, hope you get the concept. By the time I got this out of the camera, and realized its *not usefulness*, it was too late: the weaving had moved on. But(!) what this photo does show, to those who are carefully following along, is that I moved the peg with the heddles. Oops! #2. I forgot which peg they went on. If this were a Real Tutorial (tm), the author would have gone back and started over, with new pictures, to show you the right way to set this up. But this is a Reality Tutorial (tm), wherein the weaver needs to fix a few things as she works. Thank you, now back to your regularly scheduled tutorial].
Weaving continues, advancing the warp as needed. When the weaving gets too close to the heddles, it is hard to open the shed. Periodically, the warps are pulled around to create a more space for the shed. To advance the warp, tension is released, and the threads are pulled around. Eventually, all the warp is woven:
This took about an hour for me, on a Sunday morning, listening to Bhagavan Das chanting. Meditative music and activity combined: my version of devotion, so to speak.
The last few shots were tight:
but I like to get all the warp woven off.
Here is the band just off the loom: about 72" long, with about 10" of loom waste:
The last step is to wash the band, and press it, sort of like blocking in the knitting world:
68" of length in the finished band.
Next post: Making the Bag. I can't promise it will be tomorrow, but soon!
posted by Sara at 7:17 AM
![]()
![]()

17 Comments:
My dad made my Inkle Loom as well (based on the plans in the Helene Bress book). His parents were weavers and I think it makes him very proud that I've taken it up. To make the loom extra special he used three different hardwoods: some from his property, some from Oregon (where his parents were from and where one of his sisters lives) and some that he had left from a long ago project for his parents.
I've only put one warp on so far. I wasn't happy with how my color changes went and am glad to see there is another way.
Thanks for the inspiration. There's this kitchen size garbage bag in my stash full of tatting cotton in vibrant spring colors. I've known that they were destined for a warp faced weave, but didn't think of inkle weaving. Now I'm torn....Inkle weaving or card weaving,hmmm....
Thanks, Sara! Great tutorial. I've always used it on my lap. No wonder I didn't get very good tension. I'll try clamping it to the counter next time.
Incredible job on the photos and tutorial! What a lot of work, and hopefully you are inspiring total strangers to take up weaving.
ok, where do i get me an inkle? i wanna try this!
Like many others, I have several looms, not weaving on any of them right now. I've been using lack of space as an excuse, but could get out my inkle loom, or put a warp on my small tapestry loom, so that's not really the problem.
I've mainly been doing beadwork recently, which has the virtue of fitting on a tray that sits on my lap--about the amount of space I have available in my overcrowded house. So I guess I'm still "weaving."
I'm sure that I'll get around to weaving on looms again in the future.
Thank you for doing this for us. Once I get myself unpacked, I am going to give this a go. I must.
I have to second what kimd said. Thank you so much for taking the time to have a virtual class!
I have to second what kimd said. Thank you so much for taking the time to have a virtual class!
i am dying to see what you do with your finished inkle looming....
I had told my mom that I had no interest in weaving... and she was relieved ( I live at home right now) The spinning and the knitting are taking over the house... but now I am wondering if I should find myself and inkle loom too...
Thanks for this wonderful tutorial. I can't wait to see the finished bag!
I have a feeling weaving is next on the super-popular crafts curve. (Knitting, then crochet, now spinning and dyeing, tri-looms and the knitter's loom coming into their own...)
Thanks! Your tutorial was what finally got me using the Inkle loom. I actually warped it right in front of the computer while reading the steps you outlined.
Sarah, thanks so much for ans. my post today about the keel loom I won on eBay. I'm going through your blog and you are an extremely talented lady!
My friend and I challenged each other to a new summer art experience. She gave me an Inkle loom with no instructions. I gave her the first few seconds of the espresso shots to do a painting.
But my real reason for contacting you is: I have no idea the length to make heddles. I have been able to find some warp instructions. I am not beginning weaver. I have a 54" Norwood. But this is my first time for an Inkle. Can you send me in the correct direction. Thanks, Shari
Hi. question about the warp winding...
Is ALL the yellow one long continuous strand? Or do you cut and tie them off every round? I cannot tell by the pictures (poor eyesight)
I have an Inkle made of plywood and pegs. Had help warping and tried a band. Not a good first try. Was too ambitious. Warped 40 + threads of rug warp and used rug warp for heddles too. Making and up shed did not go well and my beating the weft was not good. Clamping the loom down may help and going to a lighter heddle yarn may help too. Can I email a picture of my loom to see if there are instructions for it. The maker was not a weaver and had no idea how it was put together. I did figure that out and an Schachat Inkle weaver helped me get started. I am tempted to use my Schacht floor loom to waeave a band.
8 years on, and this blog is still teaching people how to do this. Well done and thank you.
Post a Comment
<< Home